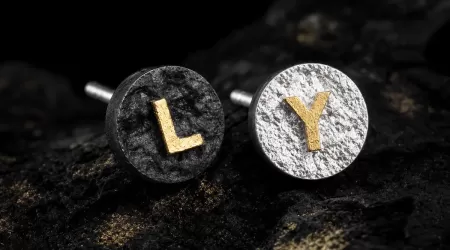
Short answer: photograph 24K gold-inlay earrings with one consistent light source, diffusion, a stable camera and a short sequence of documentary views. Start with a straight-on face, then add an angled detail, side profile, rear/closure view and a scale image. Expose for the gold highlight without turning the surrounding silver into a featureless black or white area. Keep one neutral-color reference during setup, and do not use saturation or selective edits to make the gold look richer than it does.
A dramatic hero image may help a buyer notice the design. It should not be the only evidence. Small 24K inlays are reflective; the same letter can look pale, orange, mirror-bright or nearly dark as the light and camera angle change. A complete gallery should therefore separate beauty shots from neutral record views—and it should pair every image with a written component-level material description.
What makes gold-inlay earrings difficult to photograph?
Polished silver, oxidized silver and gold do not reflect a light source in the same way. A tiny change in angle can move a bright reflection across the gold while the recessed dark finish remains unchanged. Automatic exposure may then darken the whole frame, and automatic white balance may shift a neutral silver surface toward blue, yellow or magenta.
The Gemological Institute of America’s jewelry-photography guidance recommends stabilizing the camera, using appropriate backgrounds and using diffused rather than harsh direct light for highly polished metal. Diffusion spreads the apparent light source, creating smoother tonal gradients instead of one clipped white hotspot.
This is an imaging problem, not a metal test. The older guide on what photographs can and cannot verify about silver earrings explains the evidence boundary in detail. Today’s task is narrower: make visible construction, finish, scale and option differences easier to inspect without turning the image into a claim it cannot support.
Use one controlled setup before changing the camera
Stabilize the object, camera and light
You do not need a large studio, but you do need repeatability. Place the earring on a stable surface, mount the camera or phone, choose one light source and prevent daylight or room lamps of a different color from mixing into the scene. Clean dust from the background and handle the jewelry carefully so fingerprints do not become the sharpest feature in a macro photograph.
The U.S. National Park Service Museum Handbook photography appendix recommends a tripod or copy stand for record work, diffusion material to soften specular highlights, white reflectors to open shadows, and a metric scale plus gray or color control card. A retail gallery need not copy a museum catalog frame exactly. The useful principle is to make at least one controlled record image before removing the scale and reference for the final clean composition.
| Visible problem | Likely capture cause | First correction |
|---|---|---|
| Gold becomes a white patch | Direct reflection or overexposure | Diffuse the light, rotate the earring slightly and reduce exposure |
| Silver looks yellow | Mixed light or incorrect white balance | Use one light type and reset white balance with a neutral reference |
| Oxidized recesses disappear | Flat frontal light or crushed shadows | Add a modest side angle and lift exposure without clipping gold |
| Letter edges look soft | Camera movement, missed focus or shallow depth of field | Stabilize, use a timer/remote and focus on the inlay plane |
| Stud appears much larger than expected | Macro view lacks scale | Add millimeter dimensions and a separate scale view |
Why color control matters—even when the goal is not laboratory accuracy
Camera color is conditional. A NIST study of digital-camera color error found that camera technology, the illumination spectrum and lighting uniformity can materially affect captured color. That research was conducted for controlled imaging, not online jewelry sales, so it does not supply a universal correction preset. It does show why two cameras under two lamps can render the same metal differently.
A NIST-hosted image-capture standard calls for documented white balance and a color chart or neutral standard when lighting can change. It also distinguishes diffuse, side, axial, specular and polarized lighting as tools for different features. An earring gallery is not forensic documentation, but the underlying lesson transfers: decide which feature a view is meant to reveal, and keep the capture conditions consistent enough to compare it honestly.
The Federal Agencies Digital Guidelines Initiative’s Still Image Guidelines, Third Edition emphasize faithful reproduction, color management, workflow and evaluation. A retail photograph should not claim FADGI conformance unless it actually follows and is tested against that standard. The responsible takeaway is simpler: preserve the source file, document the setup, and avoid edits that materially change the object’s visible color or geometry.
A five-view sequence for small 24K inlay details
- Straight-on documentary face. Keep the disc or decorative face parallel to the sensor. This view should show the letter shape, its position and the boundary between gold-colored inlay and silver surface.
- Angled texture view. Rotate the earring just enough for the inlay’s relief or texture to catch a soft reflection. Do not replace the straight-on view with this more dramatic angle.
- Side profile. Show face thickness, post direction and any projection. This view helps a buyer understand construction that a frontal macro hides.
- Rear and closure view. Photograph the post and butterfly back clearly. Component materials still come from the written specification, but the image can show which parts are present.
- Scale and wearing-context view. Include a metric reference in one record frame and state the actual dimensions in text. A model image adds context, but anatomy, camera distance and perspective mean it is not a measurement.
This sequence creates complementary evidence instead of five decorative variations of the same angle. It also helps customized pairs: photograph each selected letter in the intended left/right order and keep that image with the proofing record. For case, direction and ambiguous-character decisions, use the separate custom-letter proofing guide.
Diffuse light first; use drama as a second layer
Build the neutral record view first
A large diffused source placed above and to one side is a reliable starting point. Add a white card opposite the light to control contrast. Move the cards and object before adding another lamp. If the gold still clips to white, lower exposure or rotate the earring so the main reflection no longer points directly at the camera.
Add one clearly separate texture view
One more directional image can reveal texture or hand-worked relief. Label it visually as part of the gallery rather than using it as the only material view. The Metropolitan Museum of Art’s care and handling handbook treats photography as both an imaging and object-handling procedure. For small earrings, that means securing the piece, keeping stands and camera parts clear of it, minimizing unnecessary handling and avoiding hot or improvised lights close to the object.
Edits that clarify versus edits that mislead
Reasonable processing includes crop, rotation, modest exposure adjustment, neutral white-balance correction, dust removal from the background and consistent output sharpening. Keep the unedited master. If different option images are compared side by side, apply the same basic workflow to each.
Do not selectively saturate only the inlay, paint over dark recesses, clone texture, enlarge the letter relative to the disc, or composite a different closure without disclosure. Avoid replacing a realistic reflection with a painted gold gradient. The FTC Jewelry Guides in 16 CFR Part 23 address misleading representations of precious-metal content and construction. They do not prescribe camera settings, but they reinforce the central boundary: presentation must not change or substitute for an accurate material claim.
For construction terms, read what 24K gold inlay means on silver earrings and the comparison of gold inlay, vermeil and gold-plated silver. A warm detail in a photograph may fit any of several constructions; only the verified specification identifies which one is being sold.
Real product example: personalized initial studs
The current Personalized Initial Stud Earrings record identifies a 999 fine-silver disc with an uppercase 24K gold-inlay letter, black-oxidized or natural-silver finish, a straight post, butterfly backing and single-or-pair options. The live list contains a limited set of letters, so a gallery should not imply that every A–Z character is available.
For this product, a useful image set shows the front letter under diffuse light, one angled texture view, the silver/gold boundary, the rear closure, both finish options and a measured scale. Those photographs make the documented construction easier to understand. They do not assay 999 silver or 24K gold, measure nickel release, prove a universal color on every screen or predict wear life.
Browse the verified 24K gold-inlay silver earring collection to compare how the same imaging principles apply to larger motifs and darker oxidized surfaces.
Final pre-publication photo checklist
- One light type; no uncontrolled daylight/room-light mix.
- Camera stabilized and focus placed on the inlay plane.
- Diffuse record view plus an optional dramatic texture view.
- Gold highlights retain visible detail; silver is not color-shifted to gold.
- Straight-on, side, rear/closure and scale views are present.
- Every finish, letter and single/pair option shown is labeled accurately.
- Dimensions and materials are written as specifications, not inferred from appearance.
- Original files are retained and edits do not change the object’s geometry or material zones.
Conclusion
The most useful photograph of a 24K gold-inlay earring is not necessarily the brightest one. It is the view that shows the intended feature while preserving highlight detail, color relationships, scale and construction. Build a controlled five-view sequence, keep dramatic lighting separate from documentary views, and pair the gallery with accurate component-level specifications. The result can help a buyer inspect the design without pretending that a camera can replace an assay or material record.
Sources
- Gemological Institute of America: How to Photograph Gems & Jewelry
- U.S. National Park Service: Museum Handbook Part II, Appendix K—Photography
- NIST: Color Error in the Digital Camera Image Capture Process
- NIST-hosted SWGDOC image-capture standard
- Federal Agencies Digital Guidelines Initiative: Technical Guidelines for Digitizing Cultural Heritage Materials
- Electronic Code of Federal Regulations: 16 CFR Part 23
- Metropolitan Museum of Art: The Care and Handling of Art Objects
Editorial review: September 8, 2026. This guide explains photography and disclosure practice; it is not an assay, colorimetric certification or guarantee of material composition, wear or suitability.
Leave a comment